9. The Proximity Reporter Application
The Proximity Reporter application is an implementation of the adopted GATT Proximity Profile (PXP). More details can be found at https://www.bluetooth.com/specifications/gatt. It is designed to monitor any change to the physical proximity of two connected Bluetooth low energy devices using the established communication channel between them. The Proximity Profile defines the behavior of any Bluetooth device when it moves relative to a peer node to trigger an alert to the user.
There are two cases that can be identified by the Profile
- Two peers are further apart as the connection has dropped or the signal loss has increased
- Two peers are closer together as the connection has been established or the signal loss has decreased
The Proximity profile defines two roles:
Proximity Monitor(PM) which is a Generic Attribute Profile (GATT) client.Proximity Reporter(PR) which is a Generic Attribute Profile (GATT) server.
This section shall describe in detail only the Proximity Reporter entity.
9.1. Basic Services and Features
The Proximity Reporter Application supports the following services each
marked with an adopted Universally Unique Identifier (UUID).
- Immediate Alert service (
UUID 0x1802). - Link Loss service (
UUIID 0x1803). - Tx Power service (
UUID 0x1804). - Battery service (
UUID 0x180F).
The Proximity Reporter application provides the following set of features:
- Two levels of alert indications, marked as “Low” and “High” which respectively flash white LED1 either slowly or fast. The position of White LED D1 is shown in Figure 1 for Pro DK and Figure 2 for Basic DK.
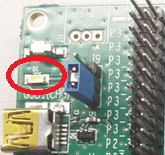
Figure 1 LED D1 on Pro DK DA1468x
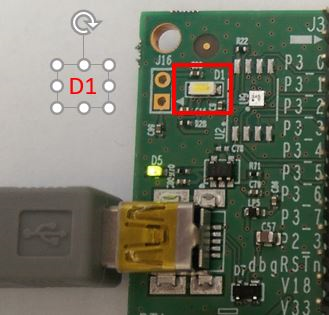
Figure 2 LED D1 on Basic DK DA1468x
- Two levels of advertising interval, a “fast” one (approx. 20-30ms) for the first 45 seconds of operation and a “reduced power” one (approx.1/1.5s) after the first 45 seconds until a connection has been established.
- Extended Sleep mode.
- Pairing/bonding/encryption.
The Proximity Reporter functionality is implemented in the
pxp_reporter_task.c source file.
9.2. User Interface
For user notification purposes the application shall use the white LED D1 presented in Figure 1 or Figure 2 when either link loss or immediate alerts are triggered. The Alert Notifications are:
- High level alert: A fast blinking white LED D1.
- Low level alert: A slow blinking white LED D1.
9.3. Importing the project
The first step is importing the project into the Project Explorer of SmartSnippets™ Studio from the folder <sdk_root_directory>projectsdk_appsdemos\
Start SmartSnippets™ Studio by double clicking the icon located in the Desktop.
Go to File > Import > General > Existing Projects into Workspace and click Next.
- Find the folder that contains the project and click “OK” (the project location is shown in Figure 3, Reference Point 1).
- Tick the pxp_reporter (Figure 3, Reference Point 2).
- Click Finish (Figure 3, Reference Point 3).
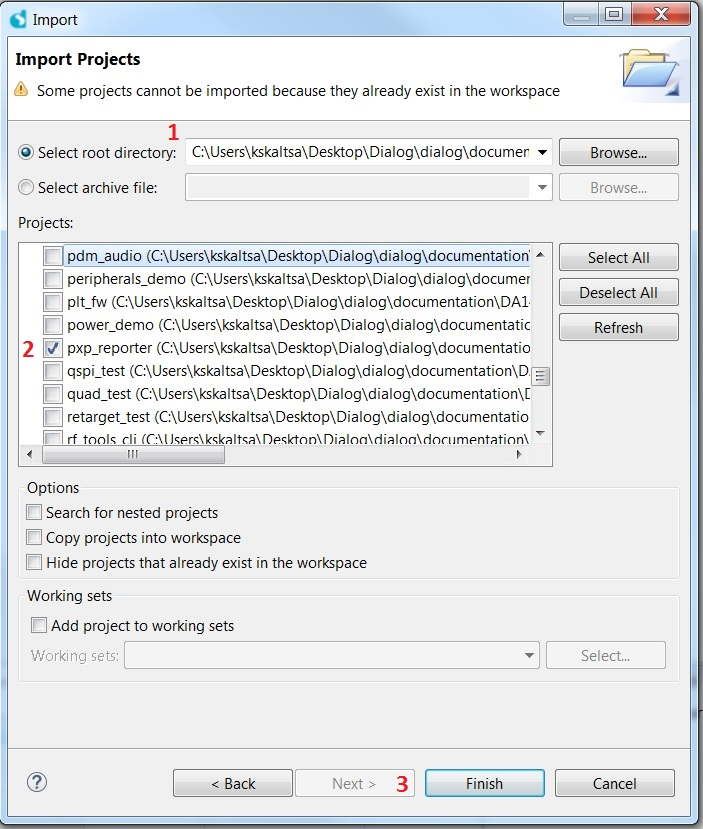
Figure 3 Importing “pxp_reporter” into Eclipse
9.4. Project Execution
9.4.1. Building
The Proximity Reporter Application project, like all other Bluetooth low
energy projects in the SmartSnippets™ SDK, comes with a
built-in configuration for QSPI cached execution mode. The project can
be built with either the Debug_QSPI or the Release_QSPI configuration to
generate the binary which is programmed into the device’s QSPI Flash
memory. This is done by selecting the project and clicking on the Build
button (Hammer icon) on the SmartSnippets™ Studio toolbar as shown in
Figure 4 or by right clicking on the project’s name and select Build
Project from the pop-up menu. The build configuration options are listed
in Table 1. At this point recommended build is DA14681-01-Release_QSPI.
| Device | Version | Build Configuration Type | Build configuration name |
|---|---|---|---|
| DA14680/1 | 01 | Debug_QSPI | DA14681-01-Debug_QSPI |
| DA14680/1 | 01 | Debug_QSPI with SUOTA | DA14681-01-Debug_QSPI_SUOTA |
| DA14680/1 | 01 | Release_QSPI | DA14681-01-Release_QSPI |
| DA14680/1 | 01 | Release_QSPI with SUOTA | DA14681-01-Release_QSPI_SUOTA |
| DA14683 | 00 | Debug_QSPI | DA14683-00-Debug_QSPI |
| DA14683 | 00 | Debug_QSPI with SUOTA | DA14683-00-Debug_QSPI_SUOTA |
| DA14683 | 00 | Release_QSPI | DA14683-00-Release_QSPI |
| DA14683 | 00 | Release_QSPI with SUOTA | DA14683-00-Release_QSPI_SUOTA |
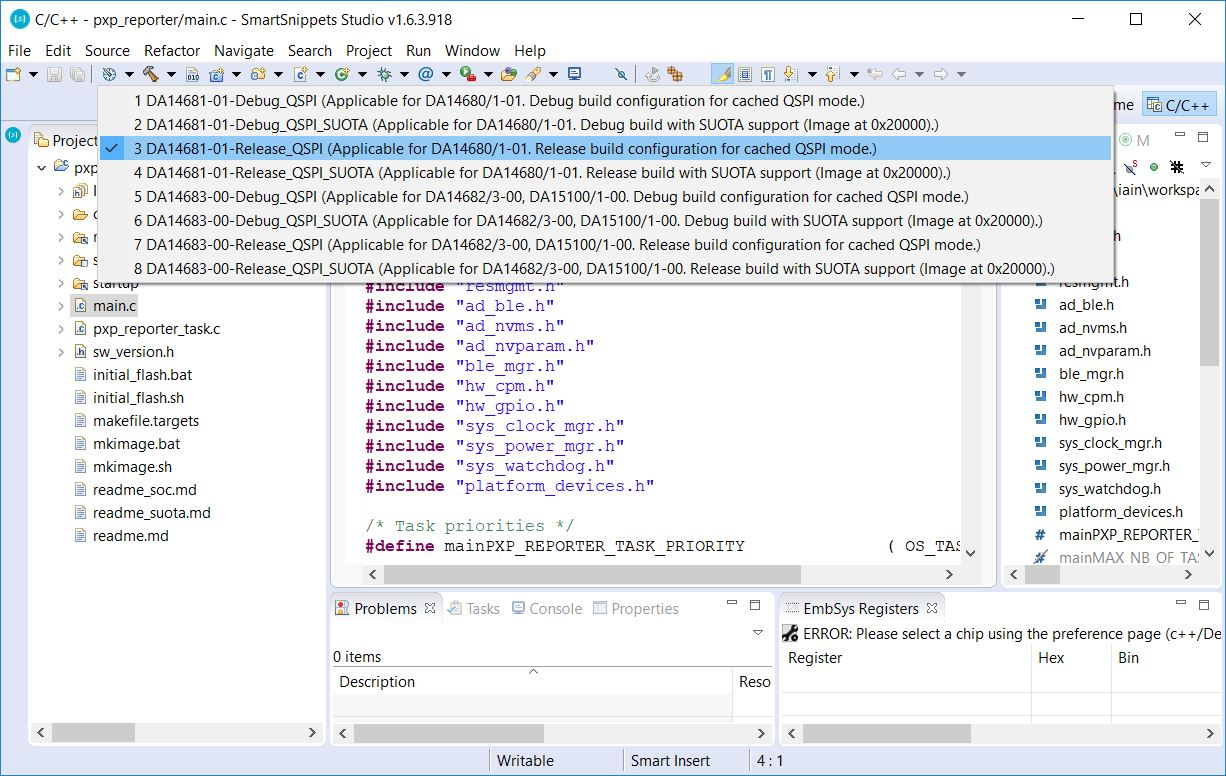
Figure 4 Project build in Release_QSPI mode
After the build process is completed the generated binary must be
written to the QSPI Flash memory. The scripts to write to the QSPI Flash
are contained in the project scripts which must first be imported. This
is done in the same way as the pxp_reporter project was previously
imported. The scripts project is found at:
<sdk_root_directory>\utilities\scripts
If after importing the scripts they are not visible, expand the Run > External tools drop-down, click on Organize Favourites, click Add and then click Select all > OK > OK.
The scripts are needed so that the user does not have to manually enter commands through a command line interface. Scripts for preparing the binary image and writing to flash memory are provided.
9.4.2. Programming the QSPI Flash
After the build process is completed, one of the provided program_QSPI
script files may be used to program the Proximity Reporter binary to the
QSPI Flash memory.
There are several program_QSPI scripts supplied with the following
naming format
program_QSPI_<transport>_<hostOS>
- where
<transport>can be eitherjtag –SWDlink is used to transfer the binary image to the target device which then writes it to QSPI flash. The name JTAG is used as a generic term even although actual link isSWD.serial– serial link is used to transfer the binary image to the target device using the ROM bootloader which then writes it to QSPI flash
- and
<hostOS>can be eitherwin– for running on a Windows host, orlinux– for running on a Linux host
More details on which script and how to use it can be found in the [Ref_02],
Section 9. However, the basic steps are as follows for a Windows host
(use _linux for a Linux host)
- Select the project folder and click on the icon as shown Figure 5 and make active the desired build configuration to produce the binary to be programmed to the QSPI Flash memory. The programming script uses the binary from the selected build.
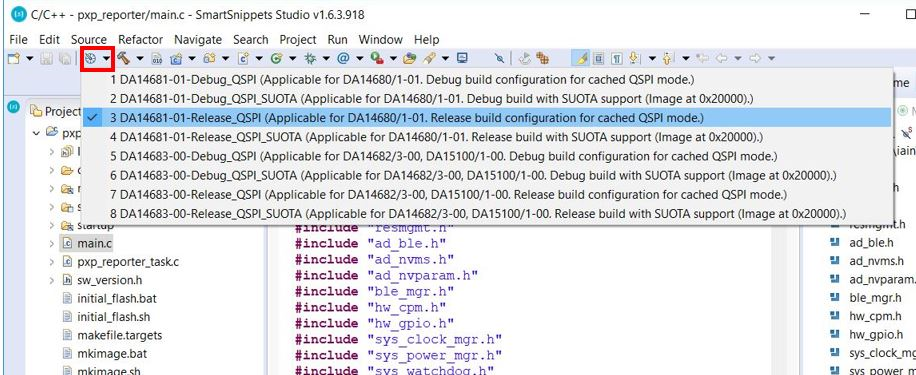
Figure 5 Selecting the build mode
- Select the External Tool Configurations button (highlighted in Figure 6), choose the appropriate script file (in this example, the
program_qspi_serial_winscript is used) to program the QSPI Flash memory and select Run (alternatively, click Run > External Tools > program_qspi_serial_win).
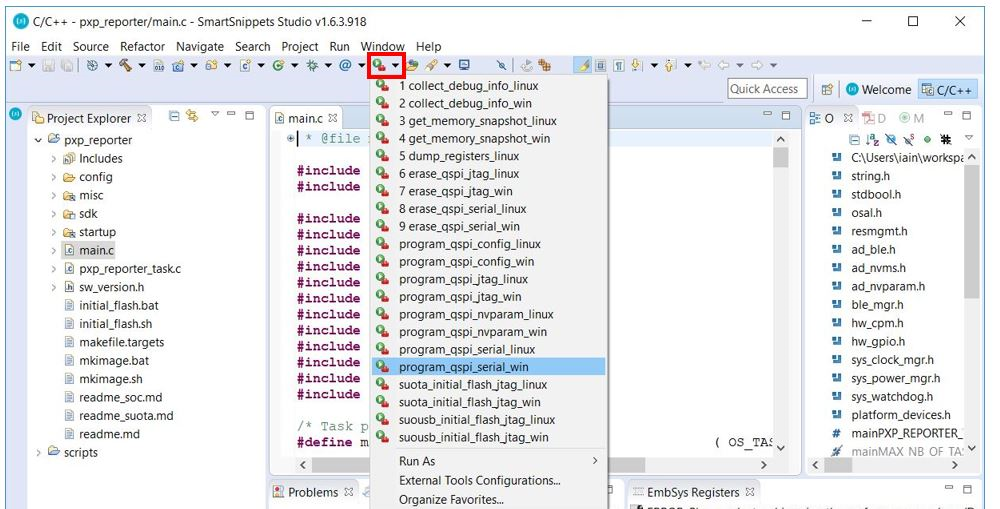
Figure 6 External Tool Configurations Menu
When executed for the first time the user is asked to configure the QSPI header. The configuration dialog is shown in Figure 7. For the DA14681 enter 0.
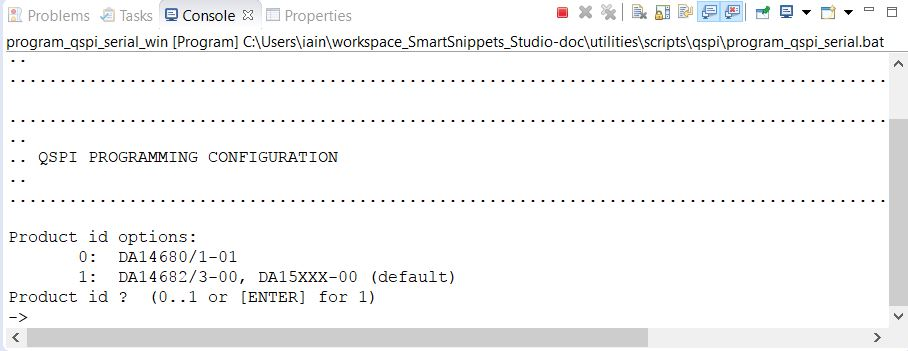
Figure 7 QSPI programming configuration
After completing the procedure, the QSPI configuration is saved and
subsequently used by the program script. The user may change the
configuration at any time by running the script program_qspi_config_win.
Running this script shows the current configuration in the console
window and then provide the option to change it as shown in Figure 8.
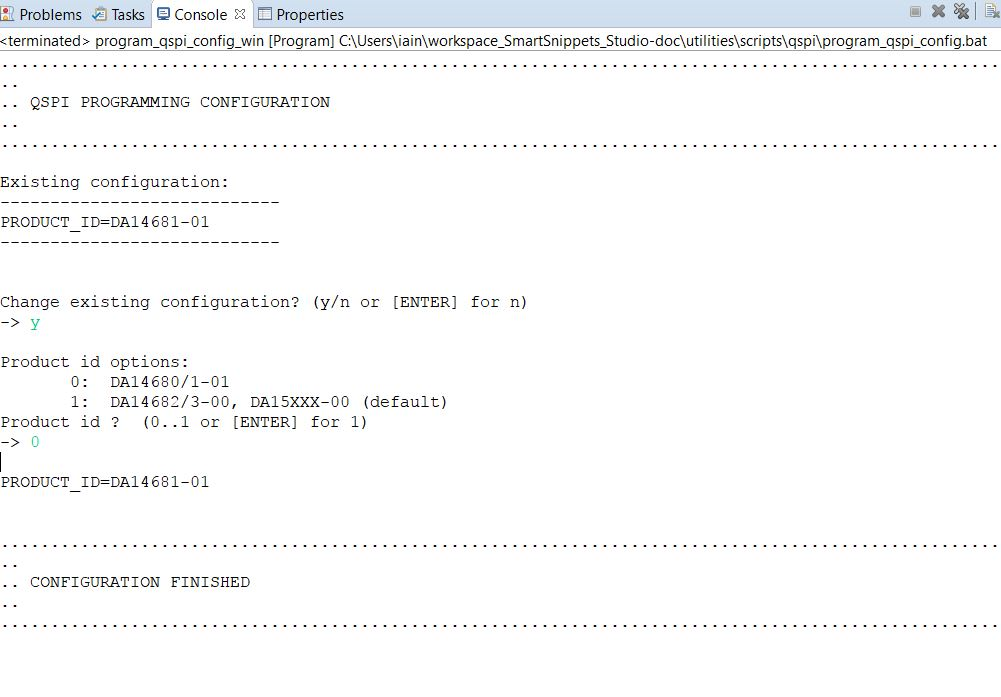
Figure 8 Changing existing QSPI programming configuration
The virtual COM port currently assigned to the DA1468x device should be entered for the QSPI Flash programming to run as shown in Figure 9. In addition, a board reset may be necessary. Once programming is completed, the Proximity application may be run by simply resetting the device.
Note
For instruction on finding the virtual COM port, please check [Ref_03]

Figure 9 Configuring COM Port
Now that the QSPI flash is programmed there are two ways to run the application.
- Press the
K2RESET button on the DK board. - Start the debugger and run the application in it. To do this the
project must be built in
DA14681-01-Debug_QSPImode. As SmartSnippets TM Studio is an Eclipse based tool the Debug view is shown a different perspective. The Debug perspective is started as follows (Figure 10):
Run > Debug Configurations > Smartbond “SmartSnippets DA1468x SDK” via J-Link GDB Server > QSPI > Debug.
This starts the debug perspective and load the symbols for the selected project from the bin file. The application can then be run using the Run button (F5).
Note
For instruction on finding the virtual COM port, please check [Ref_03]

Figure 10 Configure and start Debug perspective
When the application is running the device starts advertising and will be visible to all Bluetooth low energy devices that have scanning capabilities.
9.5. Interacting with the application
Now the project is running on the DA1468x device it is possible to interact with it via a mobile phone (the mobile phone must support Bluetooth low energy). Applications that can communicate with the DA1468x device are presented in the next two sections.
Note
There many mobile applications for Android and iOS that can interact with the Proximity Reporter firmware. The two listed are just examples.
9.5.1. LightBlue iOS application
The LightBlue iOS application can be used to connect an iOS device to the Proximity Reporter application. In such a case, the iOS device acts as a Bluetooth low energy central device and the application as a Bluetooth low energy peripheral device. Figure 11 shows LightBlue’s display after it has connected to a Dialog PX Reporter device. LightBlue can be downloaded from Apple App Store.
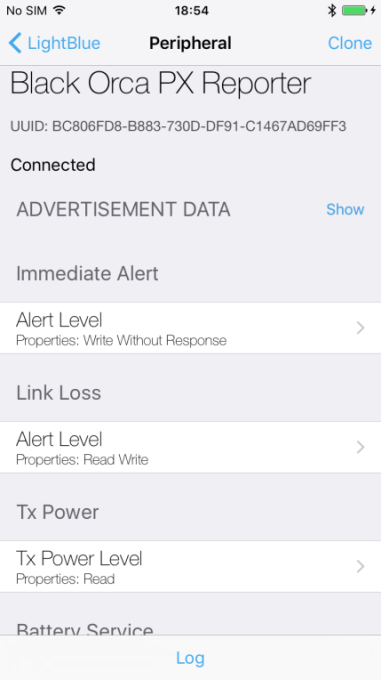
Figure 11 LightBlue application connected to Proximity Reporter application
The LightBlue application can be used to change the values of the
Immediate Alert or the Link Loss Alert level attributes. These trigger
the appropriate Proximity Reporter response.
In the Immediate Alert case, writing a hex value of 0x02 triggers a fast
flashing white LED D1 (high alert), while writing a hex value of 0x01
triggers a slow flashing white LED D1 (low alert). To turn off a
triggered alert, simply write the hex value of 0x00 in the application.
Writing these values to the Link Loss Alert Level attribute section does not trigger the Link Loss Alert immediately. It only triggers the when a link loss subsequently occurs. A link loss is not triggered when one of the devices disconnects. It is triggered by the devices moving apart and the signal strength deteriorating enough.
9.5.2. B-BLE Android application
The B-BLE Android application is an application similar to LightBlue iOS application described in the previous paragraph, but for the Android mobile OS. The application is free of charge and can be downloaded from Google Play Store.
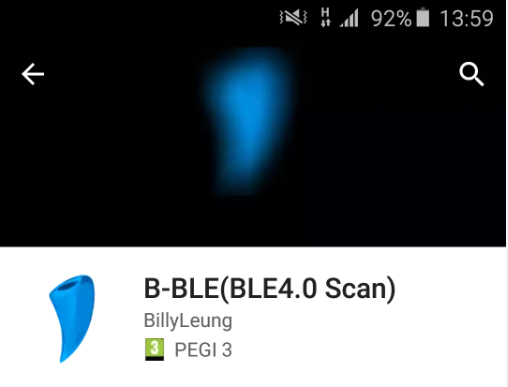
Figure 12 B-BLE in Play Store
Figure 13 shows B-BLE display after it has established connection with a Dialog PX Reporter device.

Figure 13 B-BLE application connected to Proximity Reporter application
The application can be used to read or write the available service attributes in the same manner as LightBlue application or any other Bluetooth low energy app.
9.6. Source code walkthrough
Figure 14 shows the pxp_reporter folder structure with an emphasis on
the project configuration files. More info about the
SmartSnippets™ DA1468x SDK structure can be found in the
Software Platform Reference manual [Ref_04].
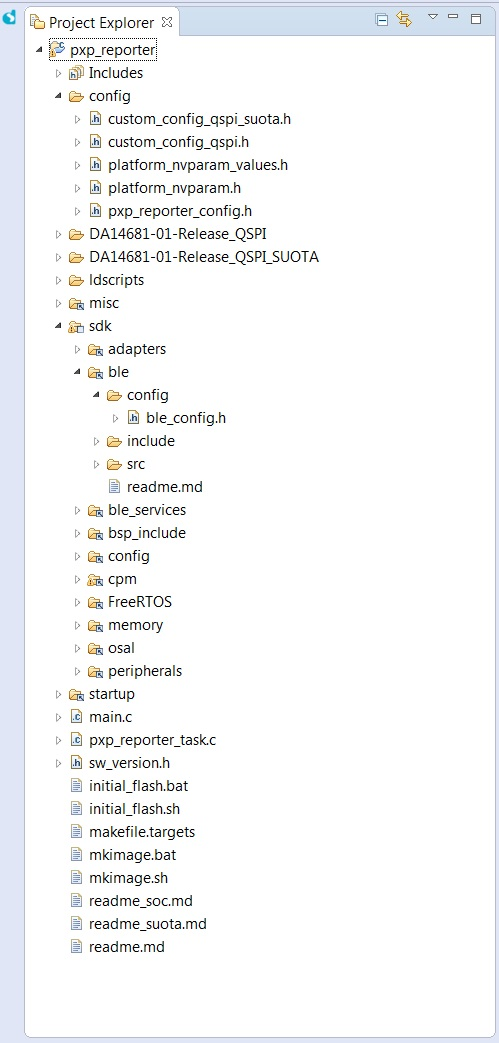
Figure 14 pxp_reporter project structure
To customize the project configuration the developer needs to change the parameters in just the following three files:
config/custom_config_qspi.h: All project specific configuration options are defined in this file. They cover the system clocks, the execution mode, the minimum sleep time, the charging functionality, the total heap size, etc.config/pxp_reporter_config.h: Can be used to configure the default name of the device.
Note
If the user has modified the BD_ADDR of the device via platform_nvparam_values.h, then the device shall use as its advertising name the one which is configured in platform_nvparam_values.h
ldscripts/mem.ld.h: Can be used to configure the sizes of the different memory sections. This file is used when the project is built to generate the mem.ld file needed by the linker.
The misc folder contains the ROM symbol definition file
(da14681_01_rom.symbols) for the Dialog software; it is included in all
projects that require linking to ROM functions and variables.
The project’s sdk linked folder contains the SmartSnippets™
DA1468x SDK components needed for the pxp_reporter project. The
components included are the following:
| Components | Description |
|---|---|
| Adapters | Peripheral adapters used by the system and the Bluetooth low energy software for access to the Non-Volatile Memory Storage (NVMS), the Flash memory and the radio. |
| Ble | The Bluetooth low energy framework used by the pxp_reporter application. This includes the BLE API, the BLE manager and the BLE adapter header and source code files, as well as the BLE stack API header files. |
| ble_services | The BLE services framework used to implement the BLE services used by the Proximity Reporter application. |
| bsp_include | BSP-related files. Board Support Package (BSP). |
| Config | BSP default configuration files – not to be modified. |
| Cpm | Clock and Power Manager. |
| FreeRTOS | The FreeRTOS operating system. |
| Memory | The Non-Volatile Memory Storage (NVMS) implementation. |
| Osal | The Operating System Abstraction Layer. |
| peripherals | The peripherals low-level drivers. |
The linked folder startup contains the necessary files for the
initialization of the system.
- The main application logic is implemented in the following files,
main.cand thepxp_reporter_task.c. The system’s initialization is implemented inmain.c, which contains bothmain()andsystem_init()functions, while the main Proximity Reporter application functionality is implemented inpxp_reporter_task.c, which contains the Proximity Reporter task function, calledpxp_reporter_task().
The main() function in most projects only accomplishes the following
basic actions:
- Performs a basic initialization of the system’s clock.
- Creates the system initialization task.
- Starts the FreeRTOS scheduler.
The system initialization task is implemented by function system_init()
in file main.c. When the scheduler is started, this is the only task
created and it is run by the scheduler.
The system_init() function initializes all other required components and
creates all other required tasks, including the application task that
implements the Proximity Reporter. In particular, system_init() does the
following:
- Initializes the system clocks that were not initialized by the
cm_clk_init_low_level(). - Initializes the watchdog service (which is the mechanism that is used to detect and recover from an unexpected execution sequence).
- Initializes the power manager and configures the sleep mode used by the project.
- Configures the system clock (
cm_sys_clk_set(sysclk_XTAL16M)). - Initializes adapter and manager components, as needed:
- The NVMS adapter (
ad_nvms_init()). - The BLE adapter task, which implements the interface to the BLE
stack (
ad_ble_init()). - The BLE manager task, which implements the BLE framework
(
ble_mgr_init()).
- The NVMS adapter (
- Creates the Proximity Reporter application task, using OSAL macro
OS_TASK_CREATE():
        /* Start the PXP reporter application task. */
         OS_TASK_CREATE("PXP Reporter",              /* The text name assigned to the task, for
                                                        debug only; not used by the kernel. */
                    pxp_reporter_task,               /* The function that implements the task. */
                    NULL,                            /* The parameter passed to the task. */
#if (dg_configDISABLE_BACKGROUND_FLASH_OPS == 1)
                    512,                             /* The number of bytes to allocate to the
                                                        stack of the task. */
#else
                    756,                             /* The number of bytes to allocate to the
                                                        stack of the task. */
#endif
                    mainPXP_REPORTER_TASK_PRIORITY,  /* The priority assigned to the task. */
                    handle);                         /* The task handle. */
- Finally, after having completed its operation, the system
initialization task deletes itself
(
OS_TASK_DELETE(OS_GET_CURRENT_TASK())). From this point on, the scheduler schedules all tasks created by the system initialization task, which was given the highest priority to prevent it being interrupted during the initialization process.
The next sections focus on the Proximity Reporter application task and the way it interfaces with the BLE manager using the Dialog BLE API and the BLE services framework.
The function that implements the Proximity Reporter task is
pxp_reporter_task() which is located in pxp_reporter_task.c. The
following Dialog API calls are used to initialize and configure the BLE
subsystem, just before the main application infinite loop.
ble_peripheral_start();
ble_register_app();
The ble_peripheral_start() function enables the Bluetooth low energy
functionality and configures the device with the peripheral role. The
application registers itself for task notifications from the BLE manager
when an event is posted on the BLE event queue using the
ble_register_app() function. This is only necessary when the application
task relies on the RTOS task notifications mechanism to unblock,
otherwise it can just block on the BLE manager’s event queue.
The Device Name for the particular project is configured in
pxp_reporter_config.h. This header file is located in the config folder.
Other projects may use different files to store the Device Name
configuration.
/* Name can not be longer than 29 bytes (BLE_SCAN_RSP_LEN_MAX - 2 bytes)*/
      #define PX_REPORTER_DEFAULT_NAME        "Dialog PX Reporter"
The application uses the BLE services API to add the services needed for the Proximity Reporter role. There are two steps when adding a service to an application:
- The service has to be initialized and added to the BLE stack database. This is done using the service’s initialization function. If the service requires specific initialization information, like callback functions for certain events the application should respond to, or values that should have an initial value, these are passed as arguments to the initialization function.
- If the service defines certain events that need to be processed in
its context (for example, writing of an attribute whose handle
belongs to the service handle range), the service has to be
registered to the BLE service framework. This is done using
ble_service_add()and the service handle is passed as an argument (in SDK release 1.0.10 and later this is seamlessly done by the service initialization function and there is no need to useble_service_add()).
The following code snippet from the Proximity Reporter task is used to register the required services to the BLE service framework.
/*
 * Register IAS and LLS
 *
 * Both IAS and LLS instances should be registered in ble_service framework in order
 * for events inside service to be processed properly.
 */
      svc = ias_init(ias_alert_cb);
      svc = lls_init(lls_alert_cb);

/*
 * Register TPS
 *
 * TPS doesn't contain any dynamic data thus it doesn't need to be registered in
 * ble_service framework (but it's not an error to do so). For now we have output
 * power set to 0 dBm.
 */
      tx_power_level = 0;
      tps_init(tx_power_level);
/*
 * Register BAS
 *
 * BAS is not included in PXP, but it can be so PXP monitor can also monitor out
 * battery level. This service should also be registered in ble_service framework.
 */
      bas = bas_init(NULL, NULL);
For the Immediate Alert and Link Loss Services (IAS and LLS
respectively), the corresponding callback functions are passed as
arguments. These callbacks shall be called respectively by the BLE
service framework if a peer device modifies the Immediate Alert or the
Link Loss Alert attributes. These callback functions are defined in the
same file, pxp_reporter_task.c.
After been initialized using ias_init() and lls_init(), the services are
registered to the BLE service framework using the ble_service_add()
function (in SDK release 1.0.10 and later this is seamlessly done by the
service initialization function and there is no need to explicitly call
ble_service_add()). The Tx Power service is initialized using tps_init()
with the argument setting the Tx power level used by the system’s RF.
The Battery Service is initialized using bas_init() and added to the
service framework. Then, bas_set_level() is called to set the default
battery level exposed by the service attribute.
The application then creates two software timers using the
OS_TIMER_START() function, one to disable the Link Loss Alert, 15 seconds
after the actual link loss event, and a second one to trigger the switch
from “Fast” to “Slow” advertising interval.
The last operations before entering the for(;;) loop set up the device
to start advertising:
/*
 * Set advertising data and scan response, then start advertising.
 *
 * By default, interval values are set to "fast connect" and timer is started to
 * change them after
 */
set_advertising_interval(ADV_INTERVAL_FAST);
ble_gap_adv_data_set(sizeof(adv_data), adv_data, name_len + 2, scan_rsp);
ble_gap_adv_start(GAP_CONN_MODE_UNDIRECTED);
OS_TIMER_START(adv_tim, OS_TIMER_FOREVER);
The advertising interval is configured using set_advertising_interval(),
which is also defined in pxp_reporter_task.c and eventually calls
ble_gap_adv_intv_set() to set the desired interval. The advertising data
is defined in adv_data array and set using ble_gap_adv_data_set().
Finally, ble_gap_adv_start() is called to start an undirected
connectable advertising air operation.
At this point the device is properly configured as a peripheral, having an initialized attribute database and has started advertising. After starting the timer needed to switch to the “reduced power” advertising after 45 seconds, the task now enters the main loop that defines its lifetime behavior and responsiveness to BLE events.
Immediately after entering the for(;;) loop, the task notifies the
system watchdog, suspends it and then blocks on its task notification
value. Task notification is an integral FreeRTOS mechanism
(http://www.freertos.org/RTOS-task-notification-API.html) which allows
tasks to handle multiple events, such as queues, interrupts, semaphores,
etc. Calling OS_TASK_NOTIFY_WAIT() results in the calling task being
blocked as it waits to receive a task notification on one of the
specified notification bits. Each bit of the 32-bit task notification
value represents a possible cause to unblock; the least significant bit
is always assigned to notifications from the BLE manager’s event queue.
For the pxp_reporter application, two additional notification bits are
defined at the start of the pxp_reporter_task.c file and they are
assigned to the time-out interrupts of the two software timers used by
the application.
The task is unblocked when the notification value of the task has been
modified to be other than zero. The rest of the for(;;) loop handles the
event that caused the task to unblock. The most common source would be a
BLE event posted at the BLE manager’s event queue. The following code
snippet presents a method of handling similar events.
/*
 * The application will first attempt to handle the event using the
 * BLE service framework.
 * If no handler is specified in the BLE service framework, the
 * event may be handled in the switch statement that follows.
 * If no handler is specified in the switch statement, the event will be
 * handled by the default event handler.
 */
 if (!ble_service_handle_event(hdr)) {
         switch (hdr->evt_code) {
         case BLE_EVT_GAP_CONNECTED:
                 handle_evt_gap_connected((ble_evt_gap_connected_t *) hdr);
                 break;
         case BLE_EVT_GAP_DISCONNECTED:
                  handle_evt_gap_disconnected((ble_evt_gap_disconnected_t *) hdr);
                  break;
         case BLE_EVT_GAP_ADV_COMPLETED:
                  handle_evt_gap_adv_completed((ble_evt_gap_adv_completed_t *) hdr);
                  break;
         case BLE_EVT_GAP_PAIR_REQ:
                  handle_evt_gap_pair_req((ble_evt_gap_pair_req_t *) hdr);
                  break;
         case BLE_EVT_GAP_PAIR_COMPLETED:
                  handle_evt_gap_pair_completed((ble_evt_gap_pair_completed_t *) hdr);
                  break;
         case BLE_EVT_GAP_SEC_LEVEL_CHANGED:
                  handle_evt_gap_sec_level_changed((ble_evt_gap_sec_level_changed_t *) hdr);
                  break;
After unblocking and verifying that the notification source is related
to the BLE manager’s event queue, the application task utilizes
ble_get_event() function to retrieve the actual BLE event from that
queue. If the event header is valid then the event is handled
appropriately.
The Proximity Reporter application which is used as a functional example contains three ways of handling events from the BLE Manager:
- The BLE service framework Handling: The event is checked against the
added BLE services using
ble_service_handle_event(). This function checks if any of the added services has defined a specific behavior related to the received event. This may be a write request to an attribute whose handle belongs to a service’s handle range, a received notification, etc. - Application Specific Handling: If the event is not handled by
ble_service_handle_event(), then the application can define a default behavior for it. The Proximity Reporter application defines event handlers for connection, completion of advertising and pair request events. - Default Handling: If the event is not handled by the BLE service
framework and a specific handler has not been defined by the
application, then
ble_handle_event_default()is called. This service certain events, like a connection parameter request and GATT server confirmation requests.
During initialization of the BLE services, the pxp_reporter_task()
function is passed two specific callback functions to be used when
certain service events occurred. These events are the following:
- Immediate Alert: An Immediate alert event is triggered when a peer
device writes the Immediate Alert attribute of the Immediate Alert
service. The callback function defined by the application to be fired
at such an event is
ias_alert_cb(), which simply calls thedo_alert()function with the level that has been set, to trigger an immediate alert using the board’s breath LED (D1 LED). - Link Loss Alert: A Link Loss alert event is triggered when the link
with a peer device, that has previously written the Link Loss Alert
attribute of the Link Loss service, is lost. The callback function
defined by the application to be fired at such an event is
lls_alert_cb(). This callback function adds the device, with which the link has been lost, to a reconnection list, starts the alert timeout timer and restarts “fast” advertising (with a 20/30ms advertising interval).
In addition to the service callbacks defined, the Proximity Reporter application also defines three event handlers, as seen in the code segment Code 6:
handle_evt_gap_connected(): The application checks the reconnection list and if the connected device is listed there, it removes it, stops the alert and the reconnection timeout timer, and re-sets the advertising interval to “reduced power” (1/1.5s).handle_evt_gap_adv_completed(): Upon advertising completion, the application restarts advertising usingble_gap_adv_start().handle_evt_gap_pair_req(): The application’s pair request handler by default accepts all pair requests usingble_gap_pair_reply(). The pairing procedure shall then be completed by the BLE manager, which also initiates bonding if requested by the peer device.
More events can be handled by the application by adding more cases to
the switch() statement in the main loop with appropriate handlers or
direct calls.