
Thinking about an epoxy floor? Great. But the most important thing is how well you prep the concrete first.
Why does it matter? It comes down to adhesion. Epoxy must grab the concrete. If the concrete is dirty or has loose bits, the epoxy sticks to that, not the concrete. That invites problems.
You want this floor to last, right? Years, maybe decades, if done right. But if the epoxy doesn't adhere well, it will peel and chip sooner. That wastes money.
It’s also about looks. A poorly prepped surface shows every flaw through the epoxy. Cracks and stains will be visible. You'll get a floor that looks like you skipped prep. You will notice it every day.
Skipping prep might seem like it saves time and money now. But it will cost more later. Redos and wasted materials await. Take the time to do it right from the start. You won't regret it.
Before pouring epoxy, you must know the concrete type. Concrete varies, and this affects how well the epoxy sticks and lasts. Standard concrete is, well, standard. High-strength concrete is denser and handles heavy loads. Knowing your concrete is the first step.
Next, moisture is bad. Concrete is porous and absorbs water. Too much moisture prevents proper epoxy bonding. This leads to bubbles and peeling. Test the moisture content with a meter or hire someone. Do not skip this.
Also, consider how porous the concrete is. Very porous concrete might need a primer or a special epoxy to fill the pores. If not, the epoxy sinks in, and the coat is not solid. Old coatings or sealers must go. Grind or blast the surface. Epoxy must bond with the concrete, not old paint. Otherwise, the new epoxy will peel off with the old coating. This wastes time and money.
Concrete grinders smooth rough surfaces and remove coatings. They use abrasive discs to level concrete. This creates a clean surface for the epoxy. For DIYers, renting a walk-behind grinder often works best for larger areas. Handheld grinders work well for edges and smaller spaces. Always wear a respirator and eye protection. Concrete dust poses a hazard. If you skip this step, the epoxy may not bond correctly. This leads to peeling and an uneven finish.
Shot blasters improve surface prep, especially for commercial or heavily contaminated floors. These machines propel steel or other media at high speed. This removes contaminants and creates a good surface for epoxy to stick to. Shot blasting gives better results, but it's often best left to pros. This is because of equipment cost and how to use it. Without good abrasion, epoxy can fail early. This costs you time and money.
Hand scrapers remove loose debris, old adhesives, and coatings. A good scraper with a sharp blade can quickly fix minor issues. It also ensures a clean surface. For DIY projects, get a quality scraper with a comfortable grip. Don't forget the power of scraping. It's often needed with grinding or shot blasting, especially in hard-to-reach spots. Ignoring these small issues can hurt the epoxy's bond and look.
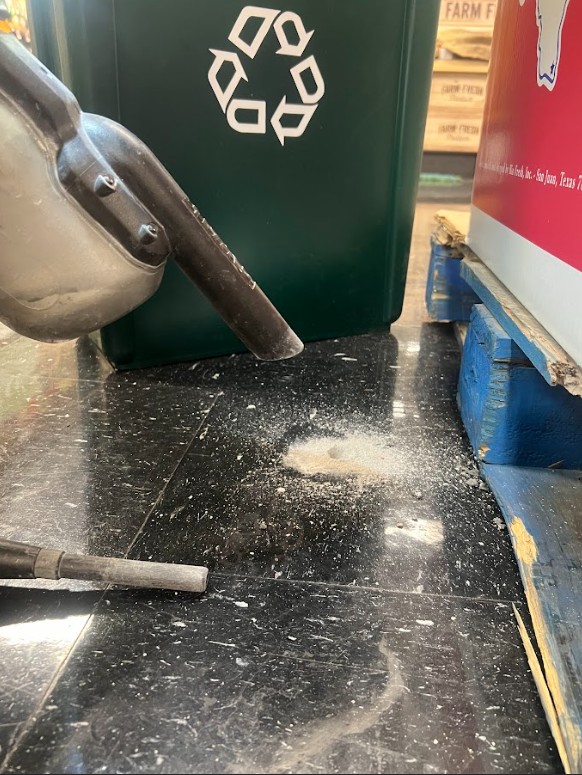
An industrial vacuum with a HEPA filter controls dust. This is important during the prep. Concrete grinding and shot blasting make lots of fine dust. This can pollute the air and stop epoxy from sticking. Regular vacuuming keeps the work area clean. It also lets the epoxy bond to the concrete. A standard shop vac won't work. You need a vacuum made for fine particles. Skipping this can cause a dusty epoxy finish and health risks.
Patching compounds fix cracks, holes, and other flaws in the concrete. These compounds fill gaps and make a smooth surface for the epoxy. Pick a patching compound made for concrete repair. Follow the instructions closely. Let the patching compound fully harden before putting on epoxy. Not fixing damaged concrete can cause an uneven epoxy finish and structural problems.

Want to put down an epoxy floor? Prep is key. A bad prep job means your epoxy will peel and bubble. No one wants that after spending money on epoxy.
First, cleaning. Remove all loose material. Sweep or vacuum. Then degrease. Even if the floor looks clean, it likely isn't. Use a concrete degreaser and scrub. Rinse well. Let it dry. Really dry.
Next: patching. Any cracks or holes? Fill them with a concrete patch made for epoxy floors. Follow the package directions. Let it cure.
Then, grinding or shot blasting. This roughens the surface so the epoxy can grip. Rent a concrete grinder from a tool rental place. For bigger jobs, try shot blasting. It's more aggressive. Skip this, and the epoxy won’t bond.
Finally, vacuum again. Remove all dust from grinding. You want a clean surface. Now you're ready for epoxy.
Before you apply epoxy, check the moisture levels in your concrete. Epoxy and moisture don’t mix well. The result can be messy and costly to fix.
There are ways to test for moisture. The calcium chloride test is common. You put calcium chloride in a dish, seal it to the concrete, and weigh it after a set time, such as 24 hours. The weight gain shows how much moisture the concrete releases.
Another method uses relative humidity (RH) probes. You drill small holes in the concrete and insert probes to measure the humidity inside the slab. This shows what's happening deep down.
Here is why this matters. If there's too much moisture, the epoxy won't bond well. It can bubble, peel, or fail. No one wants that after spending time and money.
What if you find high moisture levels? Don't worry. There are solutions. You might need to apply a moisture vapor barrier before the epoxy. These barriers block moisture from rising through the concrete. You can also improve ventilation to help dry things out, but that takes time. Get the moisture right, and your epoxy floor will last longer.
Before you apply epoxy, address any concrete imperfections. Cracks, spalls (small chips), and potholes can cause problems for epoxy.
Here is why: Epoxy works best on solid surfaces. Weak or damaged concrete can cause the epoxy to fail. Bubbles and peeling can occur.
The fix often means patching. For small cracks and spalls, use an epoxy patching compound. Trowel these strong fillers into the damaged spot. After it cures, sand it smooth for a solid base.
For bigger problems, like potholes or severe damage, a concrete resurfacer may be needed. Spread this cement product over the surface to create a smooth layer. Prep is key. Clean the area, and use a concrete grinder to rough it up for better bonding.
I've seen floors go from rough to ready just by repairing the concrete first. It's not glamorous, but it matters most. A little effort now prevents headaches and saves money later.
Let’s discuss grinding concrete before you put down epoxy. Grinding doesn’t just make the floor look good. It's crucial for the epoxy to stick. Concrete is often too smooth for epoxy to grab. Grinding creates a rougher surface, giving the epoxy something to grip.
There are different ways to grind. The method you pick depends on the concrete's condition and the epoxy you're using. Diamond grinders are common, and you'll see different "grits" of abrasive. A lower grit is more aggressive for rough surfaces or removing coatings. Higher grits are for finer profiling.
We're aiming for the Concrete Surface Profile, or CSP. The CSP scale, from 1 to 10, shows the concrete's roughness. Most epoxy systems need a CSP of 2 to 3 to stick well. If you skip this step, or don't grind enough, the epoxy might peel, bubble, or fail. Fixing that costs more than doing the grinding right the first time. Grinding isn't optional. It's essential for a lasting epoxy floor.
When prepping concrete for epoxy, you have two main choices: shot blasting and grinding. Both work, but they differ.
Shot blasting is like a strong scrub for concrete. It shoots tiny steel or metal beads at the surface. This removes weak layers and contaminants. It also creates a surface profile so the epoxy can grip the concrete. It’s fast and works well on large areas. A drawback? It can be messy. You need good dust collection to meet environmental rules. Also, the equipment costs more, which may affect your budget.
Grinding uses abrasive diamond wheels to smooth concrete. It’s less harsh than shot blasting. It works well on smaller areas or when you need more control over the final surface. It costs less at first, but it can take more time, mostly on larger jobs. Dust is still an issue, so you’ll need dust control.
Which is best? It depends. If you have a huge warehouse floor and a good budget, shot blasting is likely the better choice. For a small garage or patio, grinding may be more practical and affordable. Always think about the job size, your budget, and local environmental rules before you choose. Skip prep? Your epoxy will fail fast. Expect peeling and cracking.
Acid etching is another way to prep concrete if you can't grind or shot blast. You use a diluted acid solution to eat away a very thin top layer of the concrete. This creates a rougher surface that epoxy can grip.
Safety is very important. You're dealing with acid, so you need eye protection, gloves, and good airflow. No shortcuts. Follow the acid maker's directions closely. You usually wet the floor, put on the acid solution, scrub it, and then rinse a lot. You must neutralize the acid before putting on epoxy.
Also, where will the rinse water go? You can't dump it down the storm drain. There are rules about getting rid of acidic waste. Check your local rules. You might need to collect the water and neutralize it before getting rid of it. Acid etching can be a pain. If you don't do it right, the epoxy won't stick. Grinding or shot blasting is often safer, but acid etching can work if you're very careful.
Before you pour epoxy, you must get the concrete surface completely clean. Any oil, grease, dust, or other debris will hurt the epoxy's adhesion. It will not hold.
Start by scraping off any loose material. Then, use a good degreaser. You can find concrete cleaners at most hardware stores. Follow the instructions on the bottle. Scrub, let it sit, and then rinse very well. If the concrete is very grimy, repeat.
After cleaning, let the concrete dry. This could take a day or two, depending on the weather. Do not rush. If there is any moisture, the epoxy will not bond, and you will get bubbles or peeling. A clean, dry surface makes for a lasting epoxy floor.
Floors fail when people skip this step or do not do it well enough. The difference is big. Before, stains and imperfections could show through the epoxy. After cleaning, you get a smooth, even surface that the epoxy can grab onto, giving you a durable finish.
Concrete primer is important for epoxy flooring. You might want to skip it, but don't. A good primer helps in a few ways. It makes the bond between the concrete and the epoxy much stronger. Without it, the epoxy could peel or flake, especially where there is a lot of traffic or changing temperatures.
There are different primers, and the right one depends on your situation. Some primers work best for porous concrete. Others work best for concrete with moisture. Epoxy primers are common and work well with epoxy coatings. Acrylic primers are another choice and are often cheaper. Always read the manufacturer's advice to make sure they will work together.
Here is why using a primer is helpful: it stops pinholes from forming in the epoxy. Pinholes are tiny bubbles that can show up as the epoxy dries. They happen when air comes out of the concrete. A good primer seals the concrete, which stops air from rising through the epoxy. It makes a smooth, even base for the epoxy. Skipping this step can make the floor less durable and less attractive. You don't want that.
Things can go wrong when you prep concrete for epoxy. Moisture is a big issue. If the concrete is too damp, the epoxy will not bond well. Bubbles or peeling may occur later. Always test the concrete for moisture before you start. Calcium chloride tests work well. If moisture is a problem, apply a moisture barrier before the epoxy.
Grinding mistakes also happen. Avoid grinding too hard in one spot. This creates dips or unevenness. Keep the grinder moving and use steady pressure. Overlap your passes a bit to remove the surface layer evenly.
Contamination causes problems. Oil, grease, and old coatings must be fully removed. If not, the epoxy will not stick. Use a good degreaser and scrub the surface well. For stubborn coatings, use a chemical stripper. After cleaning, rinse the concrete well to remove any residue.
Skip these steps and you risk failure. The epoxy might not last, and you will have to redo everything. No one wants that! Address these potential problems early to save time and money later.
Thorough cleaning is essential after grinding to eliminate dust and debris. Vacuuming is the preferred method, ensuring a pristine surface. Address any cracks or imperfections with suitable patching compounds or epoxy fillers, creating a smooth and uniform base for the epoxy flooring system.
Concrete grinding creates a mechanical bond for the epoxy. This process removes surface contaminants, such as laitance and old coatings. It also establishes the appropriate surface profile, often referred to as Concrete Surface Profile (CSP), which provides the necessary texture for epoxy to grip onto.
Proper surface preparation is paramount for a successful epoxy flooring installation. A clean, sound substrate ensures optimal adhesion and prevents premature failure. Neglecting this step can lead to bubbling, peeling, and other costly issues down the line, compromising the floor's durability and aesthetics.
Let's discuss safety. This is serious. You're working with concrete dust and chemicals, so protect yourself. Start with Personal Protective Equipment, or PPE. Think of it as your armor.
Respirators are essential. Concrete dust harms your lungs, and epoxy fumes are not good either. Use a respirator rated for the chemicals you use. Eye protection is also important. Always wear safety glasses or goggles. You don't want epoxy in your eyes. Gloves are also a must. Epoxy can irritate your skin, and some cleanup solvents are worse.
Ventilation matters. Open windows and doors, and use fans to move the air. If you're in a small space, like a basement, use a portable ventilation system. It's better to be safe.
Also, learn about Safety Data Sheets (SDS). Every chemical has one. These sheets tell you about the chemical's hazards, how to handle it safely, and what to do if there's an accident. Read them and keep them close. It may seem dull, but it could save your life. Seriously, don't skip this. Treat these chemicals with respect, and you'll be okay.
Before you start applying epoxy, let's review a final checklist. This is very important. If you miss a step, your epoxy could fail sooner than expected, potentially shortening its lifespan by years.
First, is the concrete clean? Make sure it is *really* clean. Remove all dust, grease, and old coatings. Vacuum, scrape, or grind again if needed.
Next, check for moisture. Did you perform a moisture test? Don't skip this step! Too much moisture can cause the epoxy to peel or bubble. Vapor barriers can help, especially in basements.
What about cracks and repairs? Are they all filled and level? You don't want them showing through your new floor. Use a concrete patching compound and let it fully cure.
Surface profile: Is the surface rough enough? The epoxy needs something to grip. Grinding usually addresses this, but confirm the texture feels like medium-grit sandpaper.
Finally, consider temperature and humidity. Are they within the manufacturer's recommended range? Epoxy does not perform well in extreme conditions. If it's too cold, it won't cure correctly. If it's too humid, you might see blushing or clouding.
If you can answer "yes" to all of these, you're likely ready. But double-check everything. Fixing a problem now is easier than dealing with a failed epoxy floor later. Take my word for it.
You prepped your concrete. You patched cracks, ground the surface, and cleaned everything. Why is this important?
Skip these steps, and your epoxy floor will likely fail. It might last a bit, but it will peel, crack, or look bad. No one wants that after paying for epoxy!
The epoxy needs something to grip. The rougher and cleaner the concrete, the better the epoxy bonds. It's like painting. You wouldn't paint a dirty wall, right? It's the same idea.
For homeowners, good prep and install means a lasting, nice surface. It can change a garage or basement. For contractors, doing it right means fewer callbacks and happier clients. A good reputation is valuable.
Before mixing epoxy, prep the concrete. It’s the base for a lasting, great floor.
Ready to start your epoxy flooring? Contact us for a free quote. Let's discuss how we can help you get a lasting, nice epoxy floor.