Copyright MusicIncite, 2013. All rights reserved
Guitar build
A guitar string is anchored to a tuning peg. It then makes contact with the nut (see white strip in the left image). From there the string runs along the neck (without touching any frets). The next contact point is at the saddle (see white strip in the right image), which is a part of the bridge assembly. Beyond the saddle the string anchors into the bridge. When the string is picked, it vibrates between nut and saddle to produce the sound of the "open" string. Placing your finger behind the first fret (i.e. between the fret and the nut) makes the string touch that fret. Now when picked, it vibrates between this fret and the saddle. The further up the neck (towards the bridge) you hold down a fret, the shorter the length of string that can vibrate when picked and the higher the pitch of note created.
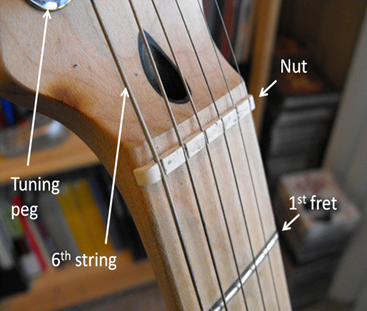
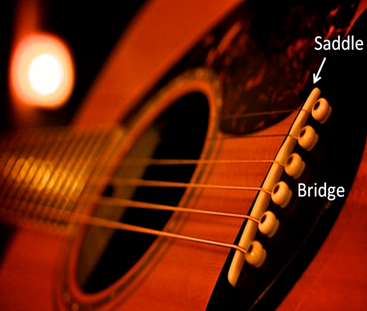
Image courtesy Tim Patterson. Image courtesy Jeremy Jenum
Think of the nut as fret
zero. Instead of your finger, the tuning peg is
holding the string down to contact that "fret". We talk about playing a note at some fret, or holding down a fret This
means placing your finger behind that fret as described above. Each fret produces a different note.
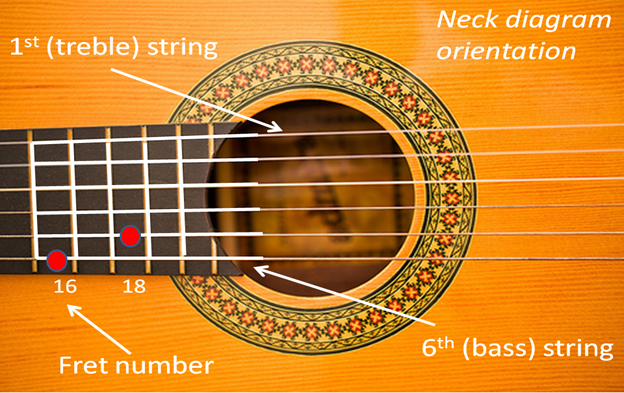
Image courtesy Daniel Ngu
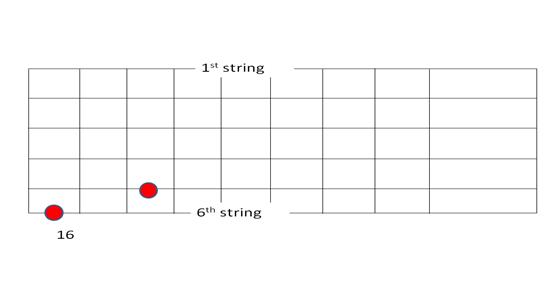
We use horizontal neck diagrams to indicate a region of the neck. The number of the fret to hold down is indicated in the gap to the left of that fret. Thus fret number 0 is drawn to the left of the nut.
Solid circles are drawn on the diagram to indicate notes to be played (e.g. red notes here). The above image shows a neck diagram overlaid on the guitar neck. Here is the corresponding neck diagram.
Lets take a look at wonderful sounding chord, the minor 9th. Click the chord to investigate in emuso

Click on this scale to check out ideas to accompany the minor 9th chord.
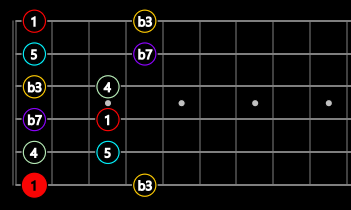
Click on this tab to load into rhythm-X
Now you've looked at a couple of minor-scale ideas, check out the toolkit, bring up the aeolian scale, then select "automatic" from the chord menu, and click on scale locations to see/hear the corresponding chords. Then try setting the chord complexity (Essentials > Chord Complexity) to ninths.
With no finger on a string, the string is held down by the tuning peg against the nut at one end, and held down against the saddle at the other end (by the fastening into the bridge). When picked, the length of string from the nut to the saddle vibrates to produce the open string note. Placing your finger behind a fret holds the string down from that fret, shortening the length of string free to vibrate (from that fret to the saddle) creating a higher pitched note.
Frets are numbered from zero (the nut) successively higher towards the saddle.
The Wood uses horizontal neck diagrams as above to represent a region of the neck. Horizontal lines represent the strings. Notes to be played are shown as solid circles on the string(s). If no fret number is given, then the notes can be located at any fret, so long as the shape is maintained. If a fret number is given, it is shown to the left of the fret it identifies, and the notes are laid out around that fret as shown on the diagram..
Note names.
The “clock face” represents twelve consecutive notes (e.g. twelve piano keys on the piano, or twelve frets on the same guitar string), here starting at C. Moving clockwise round the clock, the notes get higher in pitch. Moving clockwise is the same as moving horizontally along a guitar string, towards the body, or moving from left to right on the piano.
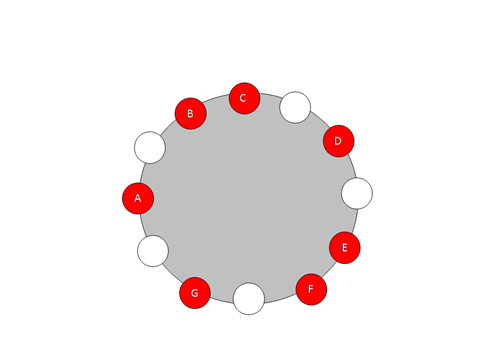
Notice on the clock that the pitches named B, C and the notes E, F are a semitone apart. The remaining red pitches are two semitones apart. Burn this into your brain forever. If you can remember where to find one of these pitches on your instrument, then just use the above pattern to find the rest.
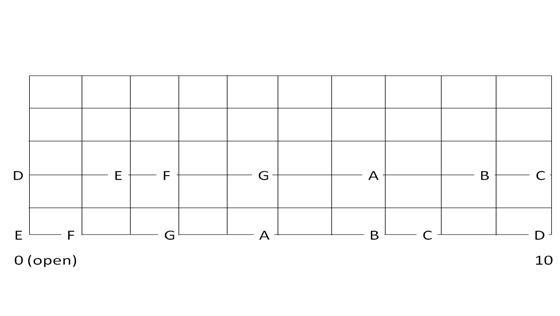
The following neck diagram
shows how the named pitches on the clock transfer to a couple of the strings on
the neck. In standard tuning and concert
pitch, the open sixth string is E.
Similarly the open fourth string is D.
Look at E on the clock. Notice F
is a semitone above E on the clock, thus one fret higher (1st fret) on the
neck, and so on. Notice visually E and F
are adjacent, as are B and C.
Tuning
Standard guitar
tuning
·
the open
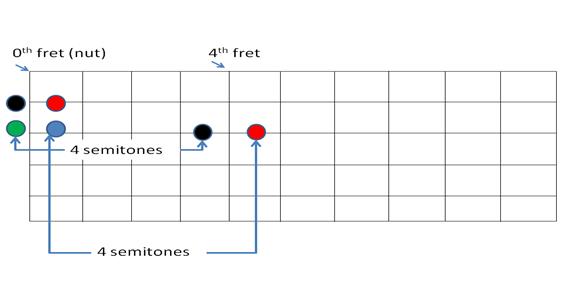
second and third string are tuned four semitones apart, as in the second
diagram below
· All other open string pairs are tuned five semitones apart, as in the next diagram.
Same colour circles are identical notes … so 5th fret on 6th string and zero fret (open string) on the 5th string are the exact same note.
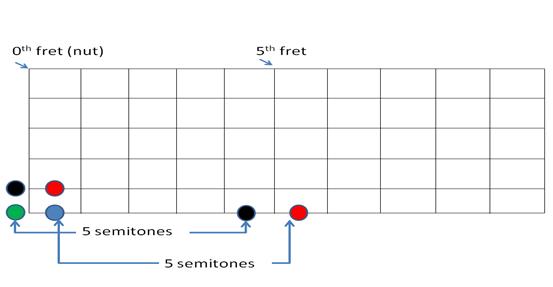
Adjust the fifth string until it matches the pitch of the 5th
fret of the sixth string, then adjust the fourth string using the fifth string
and so on. This would give us a guitar
in tune with itself, using standard tuning.
However, to be in tune with other instruments, we must first use a tuner
to make sure the open 6th string (E) is in concert pitch. (We could also use another instrument already
tuned to concert pitch to give us that reference pitch).